
Ch. 40 Crosscap (2) 
Let us try to make a Cross-cap by covering Mobius strip with a disk. We know the covering is impossible. The impossibleness can easily be clarified by tracing the appearance of Mobius strip with our own eyes. But it is an imagination work. Namely it is not so reliable. Here we concretely try to see what physical obstruction is.
On the way, we will meet curious objects that were displayed on the side of the table of contents.
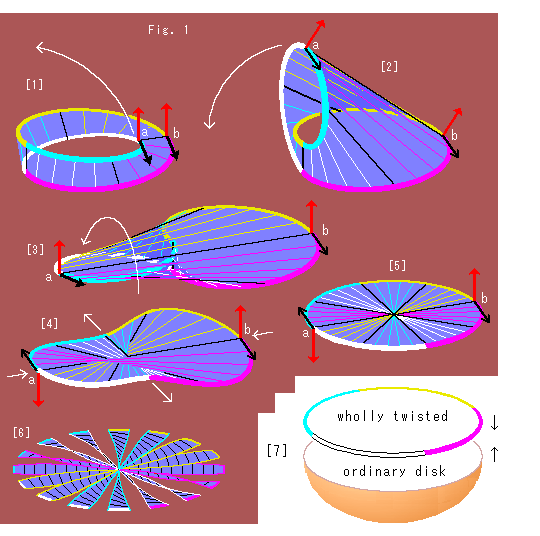 Look at Fig. 1.
What will happen if we make Mobius strip a disk?
[1]: For easy observation, the edge is colored and the surface has very elastic strings. The red arrows are normal vectors at local surface. The black arrows are tangent vectors on the edge.
Fix b and turn a to left as shown with the white arrow.
[2]: Turn a more to left downward.
[3]: Mobius strip is flatten now. Turn the left part and untwist the edge as shown the white arrow.
[4]: The left part of surface is reversed now. See red and black vectors. They indicate opposite directions at a and b. Mobius strip has a hole but this disk doesn't. Push or pull the edge like white arrows, and deform it to a circular disk. Then, the twist of surface is getting balanced.
[5]: Mobius strip is no more being a strip but a disk. Mobius strip has a hole but the disk doesn't. It looks beautiful but strange. It is still twisted. It is natural because Mobius strip is alwasy one-sided whatever deformed unless it is cut. So do not image a coinlike.
[6]: We split the disk [5] into fine sectors as shown. It seems to show how the disk is twisted. But the figure is wrong. Though we may feel difficulties, the disk as a whole is twisted by 180 in all directions.
[7]: It is easy to cover this disk [5] with a bowl-shaped ordinary disk. Unluckily, however, we can not draw it clearly.
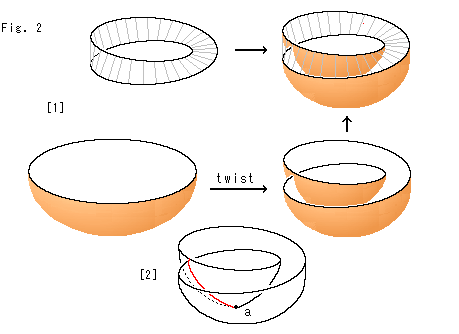 Look at Fig. 2.
Let us deform the disk instead of Mobius strip.
[1]: We allow the disk (bowl) to intersect itself, and twist it so that its edge fits the edge of Mobius strip. And then we concretely glue the disk and Mobius strip together by allowing mutual intersection. It is not abstract and we can see it by our own eyes. As to the intersection line we handle it just like Line of Self-intersection of Cross-cap.
Unfortunately, however, the appearance of finished product is widely different from Cross-cap. It is not a closed surface. To get Cross-cap we haveto perform some surgery.
[2]: The red line is the intersection line of twisted disk. There is no regulation that prohibits an intersection. That's fine. But we have a problem. We do not know what to do at the bottom a of the twisted disk. To escape from it, we say point a is an exception called a singular point.

Look at Fig. 3.
[1]: The yellow disk is an ordinary disk. The blue lines are connecting rods between the disk and Mobius strip to be glued. Let us call the connecting rods MD-lines. It is our new idea.
[2]: It is countless MD-lines. It looks like a twisted cylinder. We may say "Mobius strip is covered with a disk" by imaging this kind of cylinderlike without actual gluing.
[3]: We color MD-lines red and blue alternately for easy observation. Then, a pair of red and blue lines face each other on Mobius strip. We fix the corresponding lines for gluing, and assume both surfaces of the disk and Mobius strip are free to go through each other.
We fix MD-lines as rails to move the disk or Mobius strip. The figure shows when the disk moved down a little. Well, the disk appears strange, doesn't it?
[4]: It is a view of [3] from the left. The disk looks somewhat twisted. The disk appearances in [3] and [4] of this disk are quite different, aren't they?
[5]: We slid down the disk more. What a strange view of the disk! Well, we can not see which part is which. It is because that the disk turns as shown the arrow to make itself in parellel with Mobius strip.
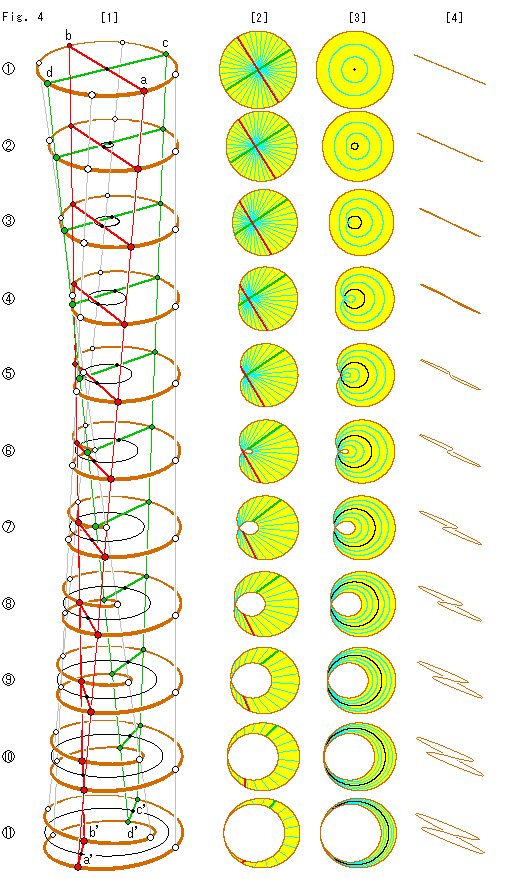
Look at Fig. 4.
We move the disk and Mobius strip along long MD-lines. We assume that the disk and Mobius strip are free to go through each other. And they can freely be deformed. For example, we imagine that the surface of disk is formed with numberless diameters made of light beams. The mid point of every diameter is not fixed at a common point called the center. So it moves when the diameter moves.
We can move either the disk or Mobius strip, or both at a time. The picture does not change whichever we choose.
The disk gets deformed as going down. But we still call it "a disk" for convenience. Its diameters move while the disk moves and they do not make an ordinary center. But we call them "diameters" for the time being.
[1]: We put Mobius strip at the bottom  of MD-lines, and move down the disk from the top
  . At the beginning we set the disk in parallel with Mobius strip for easy observation. It is to avoid the turning of disk as Fig. 3. The red and green segments are diameters that are orthogonal at the beginning . They become the segments that bridge the frame of Mobius strip as shown. The black loop is the trace of mid points of countless diameters. It is the center of disk and becomes the center line of Mobius strip.
The disk changes into Mobius strip at  . After that it forms as given Mobius strip . When we move Mobius strip from lower to upper, it changes into the disk at . We will see this area later in detail.
[2]: It is the bird's-eye view of each disk in [1]. It is drawn in half size. The sky blue lines are countless diameters. The number of these diameters in Mobius strip looks to get fewer in half. But it is not true. Because the number of diameters is a half of that of radii.
The disk looks like a heart. But as seen in [1], the disk frame at the left is about to make a coil.
A small hole appears at  , and the red and green diameters that have intersected each other are obviously separated.
The disk on the way looks smaller. It is because the bundle of MD-lines withers there a little.
[3]: It is the left side view of each disk of [1]. It is drawn in half size, too.
We will be back Fig. 4 here from the end of this chapter.
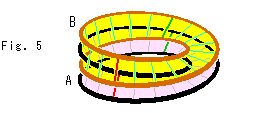
Look at Fig. 5.
The lower Mobius strip A is given at the bottom of MD-lines. A disk coming down along MD-lines chages into Mobius strip B, and faces onto the given Mobius strip A. It is possible that Mobius strip B stick is glued to Mobius strip A if they are free to go through each other. That is to say, we can glue a disk to a Mobius strip. Because the disk is no more a disk but a Mobius strip.
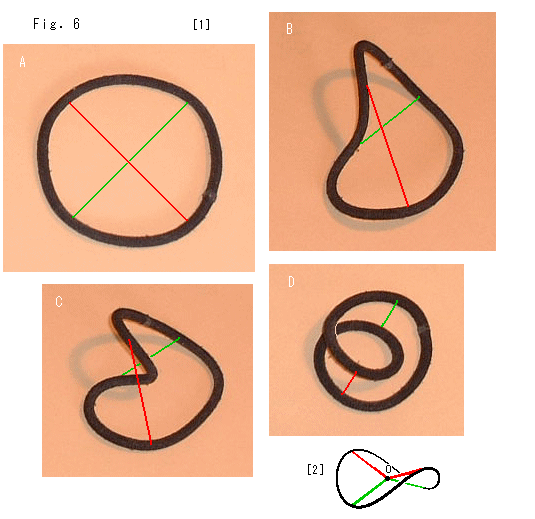
Look at Fig. 6.
[1]: The black loop is a ladie's hair binder. It has rubber inside but it keeps a shape we make. We imitate the disk on MD-lines and deform the black loop as A, B, C and D. Suppose they are a disk or a Mobius strip though they have no face. The disk A changes into Mobius strip D. The red and green lines are diameters. We drew them by hands after the photos taken. It is better to mark the end points of diameters on the black loop A beforehand. If a very elastic string is available, we had better use it, of course.
This disk is not free to go through, and so it can not make such a meeting as Fig.5. But it changes into a Mobius strip and back.
An ordinary disk, that the center or diameters are not separable does not change like this even if is free to deform. We can easily understand it with a soft rubber sheet we fumble. No hole can be opened.
[2]: It is an example of ordinary disk deformed. The midponts of the red and green diameters are fixed at the center O of the disk. And so the diameters are broken. The black loop with red and green diameters in [1] is supposed to drive along MD-lines so that it can not be deformed like this ordinary disk. A disk and a Mobius strip are compatible only if they are on MD-lines.
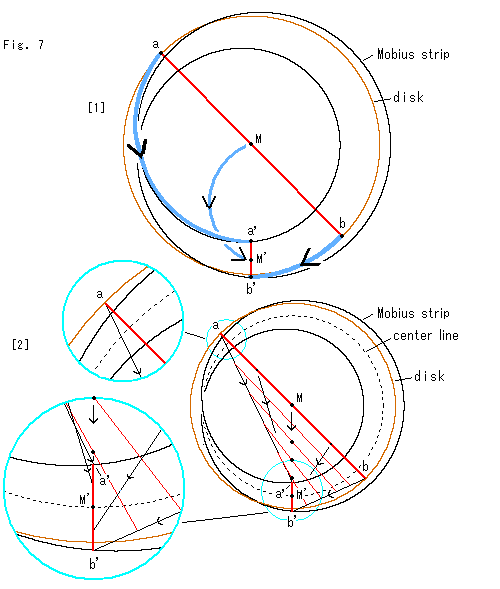
Look at Fig. 7.
How does the diameter of disk change into a Mobius strip by going down along MD-lines? Let's see it in detail.
[1]: The brawn circle is the disk. We lay Mobius strip on it, and set their centers at point M. The diagram is their bird's-eye view. When the disk changes into Mobius strip, the diameter ab of disk becomes the bridge a'b' of Mobius strip, and the midpoint (center) M of diameter ab becomes the midpoint M' of a'b'. We may guess that their loci draw rhe blue curves. But it is not true.
[2]: Let us see their actual movements step by step. The dotted line is the center line of Mobius strip. Point M is the midpoint of red diameter ab. The two sky blue circles at the left are enlarged copies of around a and M'.
Every point on the red diameter ab moves straightly as shown with the arrow, and points a, b and M arrive at a', b' and M' respectively. The circle is partially deformed in a coil shape and it changes into a Mobius strip. Nevertheless, why does every point on the red line moves straightly? Because MD-lines are made of straight lines. So it's natural.
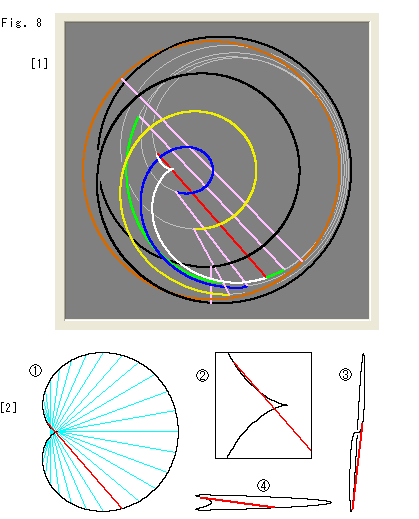
Look at Fig. 8.
[1]: It is the bird's-eye view of overlapped pictures of the processes that a disk changes into a Mobius strip. The red and pink lines are diameters. The brown circle is the original disk. Mobius srip at the final stage is black. Remaining curves are colored only from the upper left to the lower right counterclockwise.
[2]: The white curve is about to hole the disk. Let us see it in detail.
: It is the disk of the white curve in [1].
 : It is an enlargement of the peaked edge.
 : It is the left view of .
 : It is the view from the bottom of . The disk is horizontal now.
This [2] shows merely views of the front , side and top . They are not good enough to see the situation of disk that is about to drill a hole. Let us see it next by taking out the critical state only.
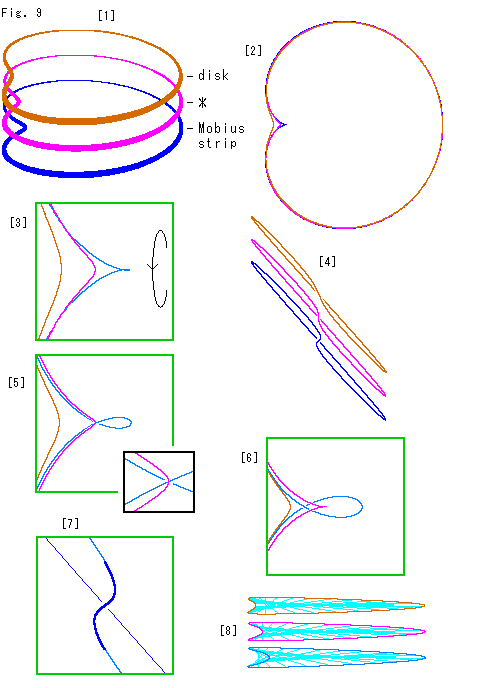 Look at Fig. 9.
Let us see the situation that the distorted disk and Mobius strip are going to contact perfectly with each other.
If it is done, it results that we could cover Mobius strip with a disk!
No, it must be impossible. The disk should be a disk and Mobius strip should be a Mobius strip even if they are glued in all one.
Even so, let's see how it is.
[1]: The brown frame is of the deformed disk. The blue frame is of the defomed Mobius strip with an infinitesimal hole. And inbetween is the pink frame (*). It is a Mobius strip and a disk simultaneously. We pitch a face on this special frame, and name it interpolation plate. The face is not necessary made of light beams. We will make sure of it later by experiment.
[2]: It is a bird's-eye view of [1]. Three frames are much the same except depressions at the left.
[3]: It is an enlarged copy of the depressions. We turn each frame as shown with the arrow to see the hole of the blue Mobius strip.
[4]: It is the left side view of the turned three frames.
[5]: On the way of turning the blue gets smooth and its hole appears clearly. The small box shows a more enlarged view at the blue X-shaped corner. The pink frame is now passing just the center of blue-X.
[6]: We turn the three frames more to see the largest opening of the blue frame. The turning angle is about 45. [4] is at this angle. Compare S-shaped part of the three frames.
[7]: It is an enlarged copy of the S-shaped part of blue frame of [4]. It is the same as the left side view of blue fame in [6]. The thick part forms a coil, which is shown as a loop in [6].
[8]: It is the horizontal view of [1] (looking up from the screen bottom of [2]). Each frame has a sky blue face now. Pay attention to depressions at the left. We can see the part of face at the depression of blue frame. But nothing appears at the depression of either the pink or brown frame.
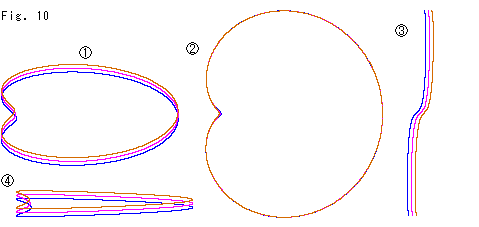
Look at Fig. 10.
We fix the pink frame of Fig. 9, and move the upper and lower frames closer to it.
Then, the three frames become very similar to each other as in . The bird's-eye view looks like a single loop except around the depressions. is the left side view of left half of . S-shaped parts of the three frames are almost identical. also shows diferences very little. is the leveled view of seeing from our side.
It seems that we can glue the disk and Mobius strip when we change them into the interpolation plate. But it is judged only from frames. What will happen if they have surfaces?
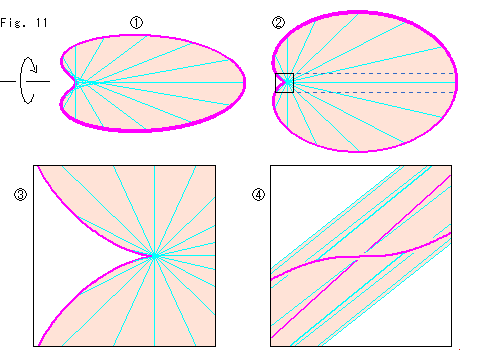 Look at Fig. 11.
We pitched surface on the frame of interpolation plate. The sky blue lines are diameters. The surface may look twisted at the left of . So we somewhat turn it as shown the arrow.
Then at appropriate turning , we see every one end of all diameters is concentrated on the depression left. is the enlargement of box in . is the enlargement of left view of the dotted arear including the box in .
Though the surface is twisted, its diameters do not make any crossing with an overpass or underpass. You might think that we can imagine it as a spiral slide. But it is no good. If we are forced to imagine the slide, its axis can not be distinguished from the turning edge. We can not tell which is which going up or down. Therefore, do not imagine with an already-known matter. Let us accept the shape of interpolation plate as it is.
Anyway it seems OK that two interpolation plates fit each other.
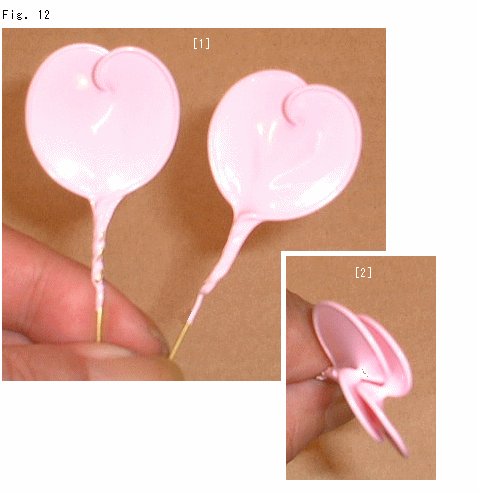 Look at Fig. 12.
Now let us make an experiment. We suppose that what is about to become the interpolation plate is the interpolation plate and that the interpolation plate may or may not have an infinitesimal hole, either will do. So we prepared two identical interpolation plates based on this idea.
[1]: We dipped two identical wire frames of interpolation plates in handicrafts liquid and got them as shown in photo. Their twisted parts are exaggerated for easy observation.
[2]: The are now in contact. We could confirm it possible that one can fit perfectly to the other without breaking either face.
You may think it is not worth to say an experiment. But can you say it absolutely right only by thinking experiment or guess work? It will be quite obvious when we observe with our own eyes that one face physically and smoothly meets with the other. The experiment is quite easy but to do it by thinking is very difficult for sure. You know a puzzle ring or like. Can you play with it in thinking? An ordinary human being has lack of ability to recognize three dimensional matters.
It is impossible to make a mathematcal surface physically. Therefore any experiment with physical things is not certain. When we stick one thing to the other, we get a surface as a border. But things have thickness whatever thin-skinned. Therefore our experiment can not help relying on some guess. However, we are able to understand that two interpolation plates can smoothly be stcked to each other.
To tell the truth, it is so hard for us to express analytically the surface of interpolation plate that we made the experiment. But do you feel fine even if you get such a solution? We prefer experiments rather than mathematical proof.
The interpolation plate is a disk and also a Mobius strip with an infinitesimal hole. We want to say they are the same, one object. But topologically, they are not homeomorphic. It is true. Nevertheless, Mobius strip and an ordinary disk are interchangeable via interpolation plate. It is confirmed now!
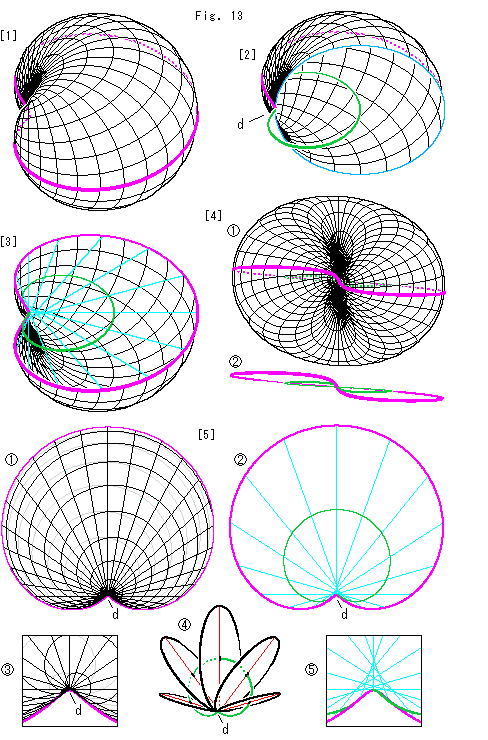
Look at Fig. 13.
Mobius strip can be otained by cuttig a solid torus. Let us imitate it and devise something toruslike for the interpolation plate. We name it a wry torus. We will go while comparing the longitude and latitude of the earth.
[1]: It is a wry torus that sandwiches the pink interpolation plate. This wry torus has no hole and not a doughnut. (It has an infinitesimal hole.)
[2]: We cut off half of wry torus and empty it, and see its inside. Point d is the bottom of dent. All lines of longitude and latitude pass this point d as a pivot. However, it is provided that these lines wave according to the frame of interpolation plate. Say, the frame is the distorted equator. This point d is on the equator but it is also the North Pole and the South Pole at a time from the view point of latitude. Every longitude line is a circle but its center is on the green center line of interpolation plate, that is the trace of mid points of "diameters". The center line is the leading center line of longitude circles. On the earth, the center of longitude is a single point. But on our wry torus the center is on a curved line.
[3]: We took off the upper part of wry torus leaving the interpolation plate. The sky blue lines are diameters of interpolation plate, that represent the surface. The diameter of a longitude circle is not that of interpolation plate. Though the center of a longitude circle is on the green centerline, the circumference passes point d. Let us see it in detail.
[4]: We turned [3] and observe the dent side, which we say the front. is the whole view. We can look through the green center line. But it is not clear. shows the frame of interpolation plate and the center line in . Naturally the center line is deformed as well as the interpolation plate.
[5]: It is the bird's-eye view of [4].
: The gray lines are on the back (bottom side of [4]). The radiating lines are longitude. They are the same as diameters of the longitude circle. That is, all longitude circles are perpendicular to the screen, and not perpendicular to the interpolation plate.
: It is the surface of the interpolation plate. For easy observation, the number of sky blue diameters is reduced to show the twist near the dent as well as [3]. The green line is the center line.
: It is the enlargement around the dent of . We see all lines of longitude and latitude pass this point d certainly.
: The green center line of interpolation plate is passing through the centers of longitude circles. The red lines are diameters of longitude circles. Every one end of red diameters ends at point d. The surface formed with red diameters is not the same as that of the interpolation plate. But the difference between them is quite small as far as our construction.
: It is the enlargement around the dent of . Each diameter of interpolation plate ends at a different point on the frame, which is not similar to the diameter of longitude circle.
Suppose the wry torus is solid. We can get the interpolation plate by cuttig it. Needless to say, we have to to do it following the "diameter" of the interpolation plate.
 Look at Fig. 14.
Let us think about drawing a wry torus that follows the change of a disk along MD-lines. We can link a sphere and a torus with MD-lines-like on trial. They change one to the other as we expected. But the wry torus in Fig. 13 does not appear on the way. So we sandwich the distorted disk in a sphere, and then we deform the sphere in proportion to the distortion of the disk. We imitate Fig. 13 and deform the sphere plausibly. This deformation may be regarded as blowing up the disk while twisting.
If we trace this change to make a bundle of lines like MD-lines, we get a very tangled lines. Therefore we simply observe the appearance of sphere regardless of such lines.
Look at Fig. 15 below.
Here we also use words of the earth, such as longitude, latitude, and so on. A meridian (line of longitude) here means a great circle, not half of a circle. We'll use these words whatever the wry torus is deformed.
 to
to  indicate figures in vertical row. For easy observation, we draw two different kinds of figugures. [1] (
 ) is dawn with only longitude lines and [2] (
 ) is dawn with only latitude lines. In addition, skeletons [3] ((1)(5)) with the north pole, the south pole, the equator and two longitude lines.
(,,(1)) in the left is constructed with an original disk. It is a perfect sphere. The antipodal points of this sphere are identified as well as the disk. (,,(5)) in the right is a nicely-shaped Mobius strip.  (,
(, ,(3)) in the middle is the wry torus of Fig. 13.
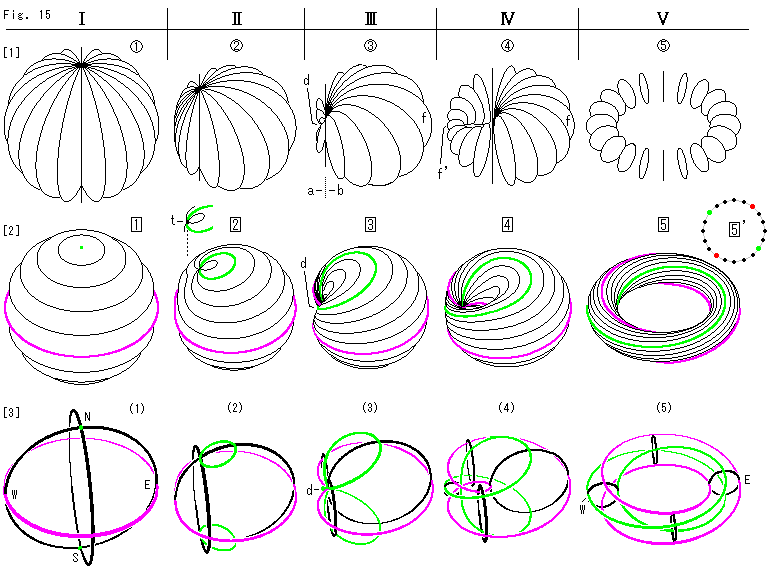
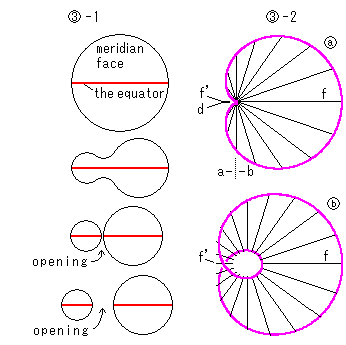 [1]: We draw a meridian as a circular laminate. Let us call it "a meridian face" for convenience. A meridian face that is perpendicular to the screen is drawn as a straight line.
: The pivoted longitude lines here will be spread and become small sectional disks of the torus at the final stage .
: This wry torus is somewhat small. It is due to the fact that the bundle of MD-lines shrinks a little in between the top and bottom. Meridian faces between and are not trlue circle but gourd-shaped like  .
.
: We assume that the interpolation plate has an infinitesimal hole. The number of diameters of the disk never changes (see Fig. 4). But let us allow that the number doubles here at . Because lines in figures show not only the lines of longitude but also the appearance of object, how curved and how deformed. If we do not do the doubling, the number of meridian faces looks suddenly reduced by half for our eyes when the sphere comes from to .
See figure -1 right. The face of equator is the disk. (We neglect the deformation of equator face in the figure.) A meridian face pinches in, and separates into two the moment the equator face openes a hole.
Some of small meridian faces in above are hidden in the dent d. But the nmbers of meridian faces in the letf a and the right b are the same. Figure  of -2 right shows the bird's-eye view of . The left end of meridian face f is the bottom of dent d, where another meridian face f' stays as a point on point d. Thus every meridian passes point d. And then, meridian faces scatter when the hole gets wider as shown in
  .
.
: We can see a small hole getting wider. The directions of meridian faces are not the same as those of Fig. 4. We set them considering that the sphere shall be a nicely-shaped torus. Namely, the horizontal diameter of every meridian face is directed to the center point of the hole. Meridian face f' that was a point at is growing and located at the opposite of meridian face f.
: It is a nice torus changed from the sphere. Now all meridian faces are the same in size as well as .
[2]: The line of latitude is drawn as a laminate, too.
: The latitude lines are circles now. But it is only here in . It will be diformed very much right after this stage. The green spot is the North Pole. The magenta line is the equator. The North Pole corresponds to the center of the disk in Fig. 4. The South Pole that is beyond the bottom of the sphere also corresponds to the center. See [3] of Fig. 4. We draw the same number of latitude as that of the longitude in . By doing so, the numbers of them will be equal on the final torus. See ' that is the section of the final torus.
 : The left top is sanking a little. Naturally it is the same on the Southern hemisphere. The green Noth Pole took the shape of a loop. We still call the loop "North Pole" though it is no more a point. Meridian faces gather along the vertical dotted line that drops from point t at the left end of the green loop. But we can not call the dotted line the earth's axis. Because our Noth Pole is the whole loop. You can count the number of lines of latitude from the equator.
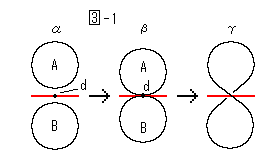 : Point d is hidden in the dent but all latitude lines pass it as well as longitude lines. The North Pole and South Pole (loops) pass point d, too. That is to say, all of curved lines pass point d now. See figure -1 right. Loop A is in the north hemisphere and loop B is in the south hemisphere. They are at the same degrees in latitude and pair up. And they join each other at point d as shown in
  to
to  . Then they are united as a single loop in the shape of deformed figure-eight as shown in
  .
The situation here in is quite contrary to the case of longitude lines in . A meridian face that came from splits into two loops at . But a pair of latitude lines that came from becomes a single loop at .
.
The situation here in is quite contrary to the case of longitude lines in . A meridian face that came from splits into two loops at . But a pair of latitude lines that came from becomes a single loop at .
 : We see that latitude lines are swisting.
: All of latitude lines are flowing while twisting and form a torus. The green line was the loop made of the North Pole and the South Pole. The red line was the equator.
The central point of sphere is not drawn but it is the core of torus now.
[3]: It is a skeleton with a few meridians, the equator, the North Pole and the South Pole. The number of meridians doubles on the way of left to right. N, E, W and S in (1) are antipodal points. One of meridians at (3) looks missing. But it exists as a point in the dent.
Points E and W correspond to the antipodal points in (1). But points N and S in (1) do not appear in (3) as points but they are spread as the green loop.
When we look over (1) to (5), we realize that one to one correspondence is kept between (4) and (5) but not at any stage of (1) to (3). Yes, it is true. We made an imitation regardless such correspondence.
Let us go back to Fig. 4 long way up.
We see the situation in Fig. 4 again. (You may open one more web-page and see Fig. 4.) , , and in the upper group are homeomorphic. And ,  , , , and in the lower group are homeomorphic. But the upper group and the lower group are not homeomorphic. However, the change through is practical continuous change. And we can go up and down from to without any trouble. The hole opens and closes by itself.
Topologists express a difference in word "homotopy" or "isotopy" or like. Well, we do not care such a term. It is Ok with us even if they say that one with a hole and one without a hole are not the same. The interpolation plate is like a free border land. The disk and Mobius strip can be transferred through the land from one side to the other where they say different doma. The sphere and torus are in a similar situation.
[Back] [Next] [Contents]