
Ch. 42 Klein Bottle & Projective plane 
Klein Bottle and projective plane are quite similar to each other, aren't they? We want to know more about projective plane by comparing with Klein Bottle. Reality may often be judged from similarity. So we fiddle around with them as usual.
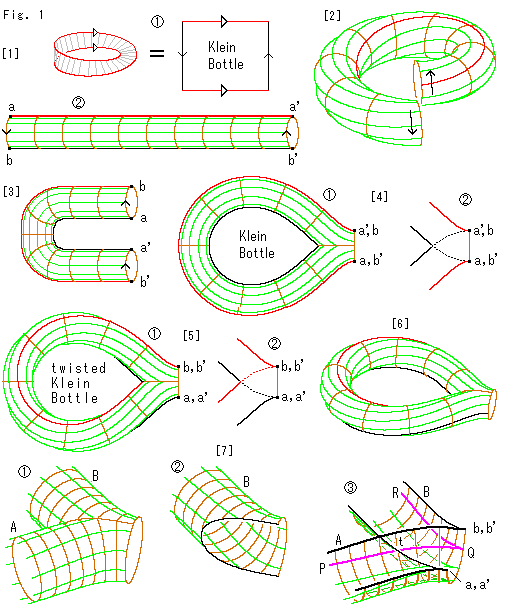 Look at Fig. 1.
An orthdox shape of Klein bottle looks unbalance. So let us invent a symmetric one.
[1]: The square with arrows  represents Klein bottle. We begin with it. First we make a cylinder
  by gluing delta arrows. The red lines are just for illustrations.
[2]: We try to make a torus-like, but the arrows never be in the same direction whatever we twist the tube. It is a well known matter.
[3]: But bend the tube in U-shape, and the arrows are automatically arranged in order without twisting.
[4]: Suppose the surface of U-tube is free to go through, and we joint both ends of U-tube while keeping their arrow directions unchanged as shown  .
.  is a transparent view arround the joint. The shape is completely symmetric.
[5]: The Klein bottle is made for an appearance. But it is not ready to correspond to Mobius strip of [1]. So we must twist the tube by 180 though arrows are already identified.
  is twisted one. Compare the transparent view
  with that of [4].
[6]: It is a stereoscopic picture of [5].
[7]: They are detailed drawings around the junction. They are drawn based on Klein bottle [6]. But it is not necessary to twist. Usually we take no notice of twist of surface itself. "twist of surface itself" here means nothing about the shape of surface. It is a relation among points on the surface. That is to say, the shape of surface remains unchanged whether the surface is twisted or not.
The appearance of junction is a simple two-way socket  with legth A and B.
  is leg B after A taken off.
  is the lower half of
  . In
. In  surfaces cut each other. The pink line is an example that passes this junction from A to B. The pink line came from point P on A arrives at point t on B, but it, without turning, continuously goes along the surface of A upto point Q on the edge. And then it transfers to B and goes to point R on B. This is the regulation for 3-D model of Klein bottle.
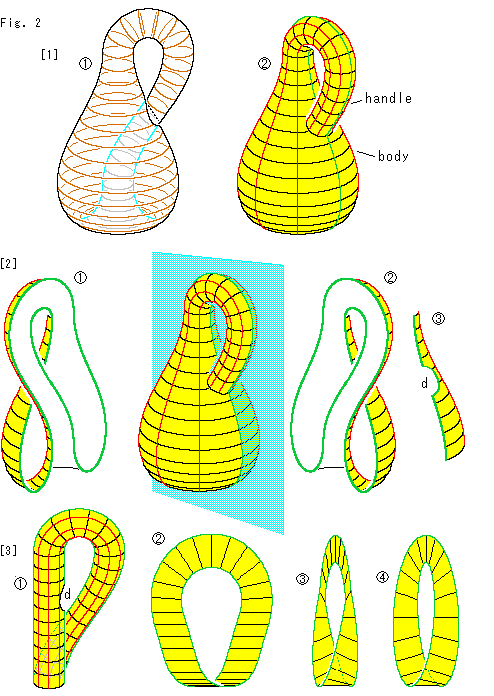
Look at Fig. 2.
They say that Klein bottle is made of two Mobius strips. Let us see it by using a standard one.
[1]:  is transparent view and
  is appearance. Let us call the tubelike part "handle" and the fat part "body" for convenience of explanation.
 [2]: We split Klein bottle in half along the green line.
  is the left part, and
  is the right part.
  is beyond the handle. It has dent d for the handle. So does the left part
  .
.
The separated pieces  and
and  are perfectly symmetric. They are Mobius strips, one right-handed and the othe left handed.
[3]: Let us make sure of it. Take the left half and make its body narrower as  . Flatten it and make its bottom in U-shape as shown
  .
.  is the side view of
  . Smooth it and we get a Mobius strip in well-known shape. Similarly we get another Mobius strip from the right half.
That is to say, Klein bottle is made of two Mobius strips glued. But, needless to say, we must make the dent d for the handle.
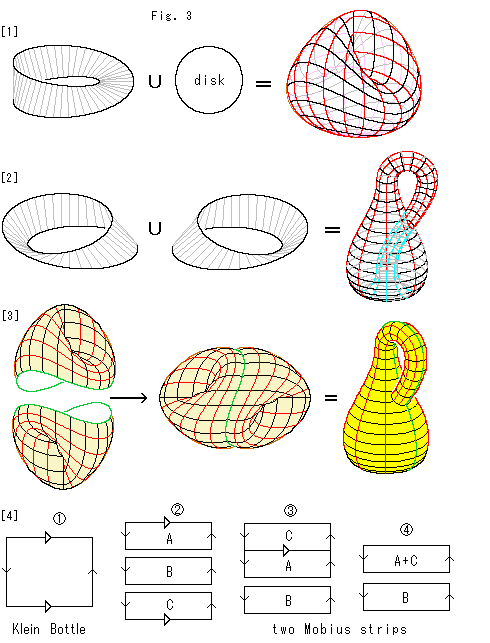
Look at Fig. 3.
A Mobius strip becomes Cross-cap when it is glued to a disk. Two Mobius strips become Klein Bottle when they are glued together. And two Cross-caps with truncated bottom become Klein Bottle when they are glued together.
Here we line up these similarity diagrammatically.
[1]: It shows that Cross-cap is made of Mobius strip and a disk. The symbol U means abstract gluing.
[2]: It shows that Klein Bottle is made of Mobius strips, one is right-handed and the other is left-handed.
[3]: The cental picture is Klein Bottle that is made of jointed Cross-caps. It is perfectly symmetric. The very right is an ordinary Klein Bottle. Green lines are joint seams. They correspond to each other. To exchage symmerical one for non-symmetrical, or vice versa, we have to reassemble after taking the former to two Mobius strips.
[4]: Squares with arrows show that Klein Bottle can be divided into two Mobius strips. We cut Klein Bottle  into three parts, A, B and C as shown in
  . Arrows
  ,
,  should be identified in each suare, not among different squares, A, B or C. Next, we glue A and C by identifying delta arrows, as shown in
  . Then we get two Mobius strips
  . Note that Mobius strips
  do not tell us anything about twisting direction, right-handed or left-handed.
We have drawn many similar diagrams. But here we want to show that two Mobius strips are equivalent to Klein Bottle.
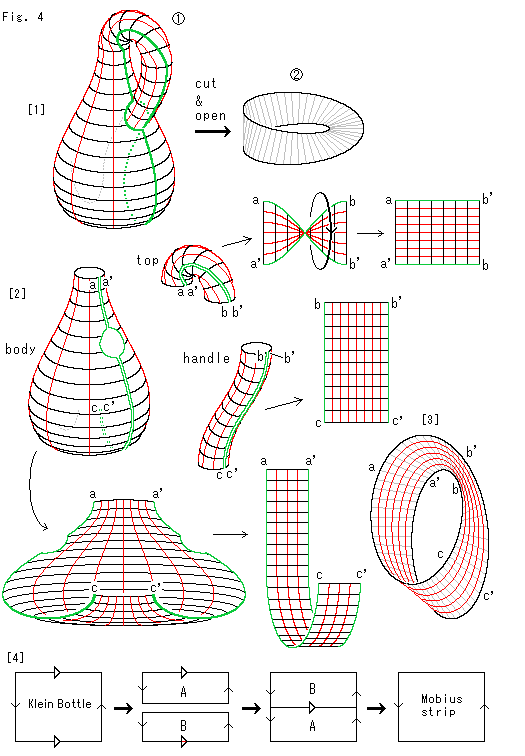
Look at Fig. 4.
In Fig. 2 we cut Klein Bottle into two exact halves and got two Mobius strips. But we can get a single Mobius strip by different way of cutting.
[1]: We cut Klein Bottle  along the green line. Then we get Mobius strip
  .
.
[2]: In order to see how the single Mobius strip comes out, we separate Klein Bottle with green cut line into "body", "top" and "handle". And we shape them into rectangles. Pay attention to that the cut line on the top is twisted by 180 . So we untwist it on the way as shown with the arrow.
[3]: Three rectangles are rejointed, and we get Mobius strip. The rectangle of the top was untwisted but what rejointed is automaticaly twisted again.
[4]: It is the series of squares with arrows that represent the cutting above. Seeing this picture, we can get Mobius strips as many as we like, can't we?
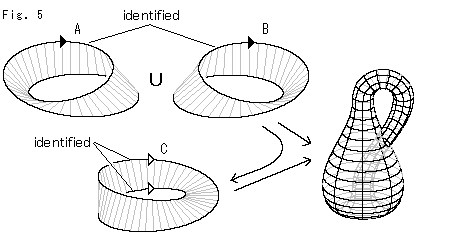 Look at Fig. 5.
The number of Mobius strips obtained from Klein Bottle depends upon how it is cut, and where. Because, to the contrary, the procedure to assemble Mobius strip is different. With two Mobius strips A and B, we can get Klein Bottle when one edge is identified with the other edge. With a single Mobius strip C, we can get Klein Bottle when the edge is identified with its own edge (opposite side).
Then, we are able to get the single Mobius strip C from two Mobius strips A and B via Klein Bottle, aren't we? Yes, we certainly are. However, it is impossible to get the single Mobius strip C directly from two Mobius strips A and B.
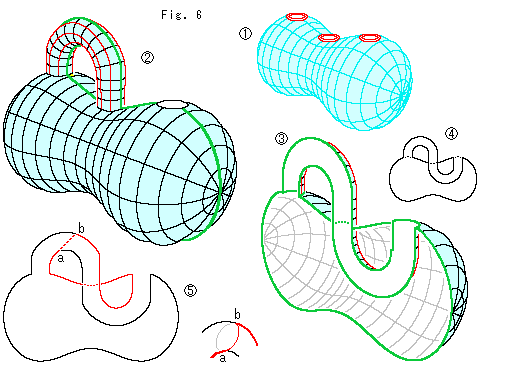
Look at Fig. 6.
 : It is a flower vase we happened to find in downtown.
 : The shape is so interesting that we put an S-shaped pipe through its three openings. It became a Klein bottle. Have you ever seen this kind of Klein bottle?
 : We cut half off and see inside. This is a Mobius strip!
 : If we want to get projective plane with that Mobius strip, the shape of disk to be glued must fit the figure. Imagine the disk that has neither inside noe outside.
 : We get a single Mobius strip if we cut Klein Bottle along the eight-shaped red line. The red cut line lies on the black line, but it passes points a and b on the way. The picture lower right is a sidelong glance around points a and b.
By the way, they often say that Kein bottle has neither inside nor outside. We do not think it appropriate wording. It is better to say that we can define neither inside nor outside of the surface of Kein bottle. Because, in fact, we can pour water into a model of Kein bottle.
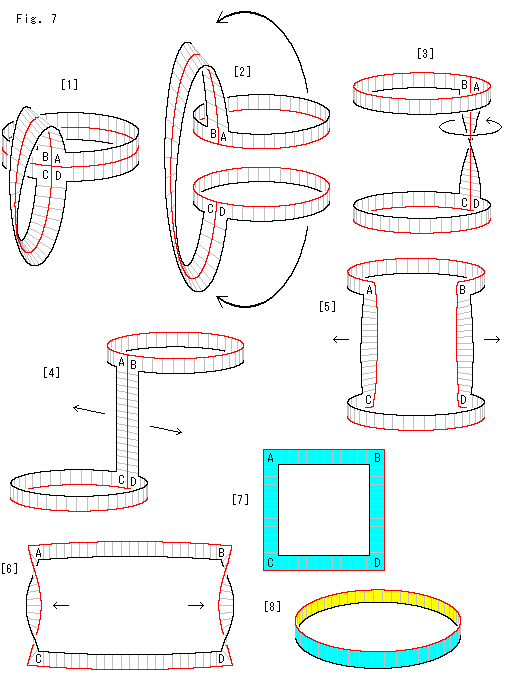
Look at Fig. 7.
What a cylindrical strip and Mobius strip are sticked crosswise is a part of Klein Bottle. We cut it along the center line and see what will happen. We illustrate the process here step by step. I would be helpful to understand coming items.
[1]: First we cut the cylindrical part alon the red line.
[2]: We turn the upper and the lower as shown with arrows.
[3]: Then, it becomes U-shaped. The vertical part is twisted. We untwist it following the arrow.
[4]: Now we cut it along the vertical red line and pull it apart to the right and left.
[5]: The vertical parts AC and BD get twisted when they are separated while keeping faces of the upper part AB and the lower part CD vertically. In the drawing the vertical parts AC and BD are twisted 90 now. The twisting directions at the right and left are opposite.
[6]: We pull both sides more.
[7]: Twists on the right and left cancel out each other, so that we can draw a flat square belt. We painted its front blue for any fool now knows that it is not one-sided.
[8]: The square is topologically the same as a cylinder.
Now we know the true character of the cruciform Klein Bottle is a simple loop belt, don't we?
We should make sure of some fundamentals of twist before we get into the cutting of cruciform projective plane.
Hereafter, 180 is as a unit of twist, R denotes right-handed and L denotes left-handed.
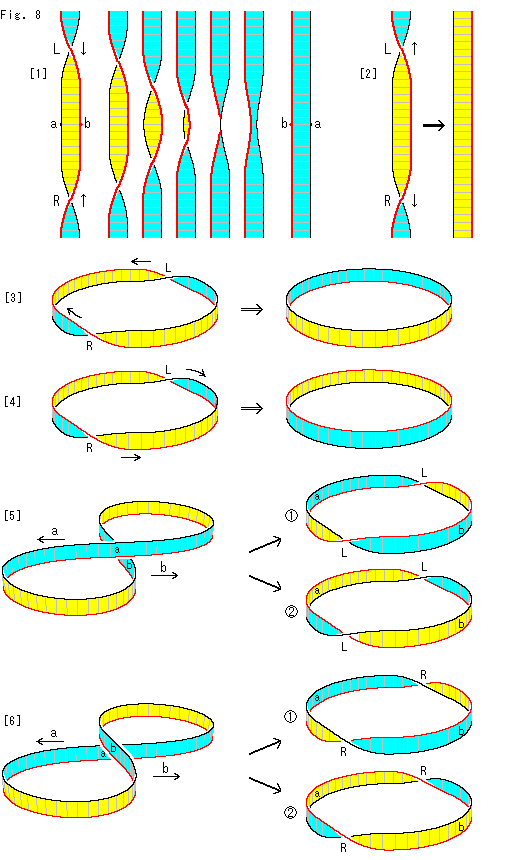
Look at Fig. 8.
[1]: The belt at the left end has R and L. We slide them to the middle while keeping the top and bottom fixed. Then, needless to say, the belt becomes flat witout twist. It is because that R and L have been canceled mutually. Here we should pay attention to that the final belt at the right end faces us with only the sky blue side, and points a,b in the yellow part are reversed.
[2]: This time, we fix the middle, and slide R downward and L upward. Then we get the opposite result to [1].
[3]: Let us do the same as above with a loop belt. We slide R and L to meet each other while keeping the right fixed. Then, R and L are mutually canceled. And the inside is blue and the outside is yellow with the upper black edge and the lower red edge.
[4]: If we fix the left and slide R and L to the right, the result will be opposite to [3].
Next is a case that twists come out.
[5]: The figure-8 belt looks meandering and not twisted. But two L appear when a and b are pulled right and left as shown with arrows. Twits came out of non-twist. Namely the figure-8 belt twists all by itself when the shape is changed like the diagram. Say the figure-8 belt has potential twist. ("potential twist" is not a term of differential geometry or like.)
 is when the part around a is fixed, and
  is when the part around b is fixed.
[6]: This figure-8 belt is different from that of [5]. a is under b. And when a and b are pulled right and left, two R appear.  is when the part around a is fixed, and
  is when the part around b is fixed.
The figure-8 belts [5] and [6] are not different view of the same object. It is obvious if we compare twisted loops.
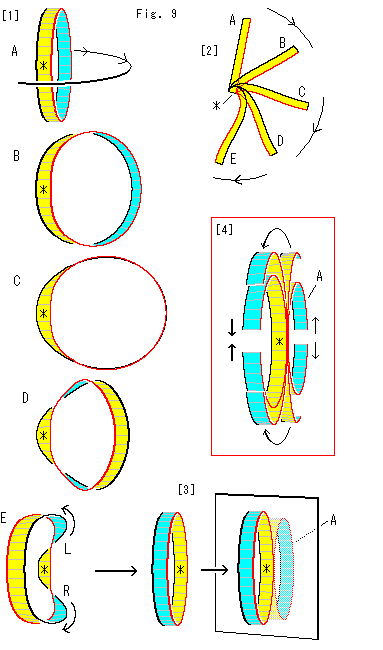
Look at Fig. 9.
Let us see one more fundamental of twist.
 [1]: We deform the roop A. We fix the front part marked with "*", and turn the back around it. Then roop A changes to B-C-D-, and finally E.
[2]: It is the bird's-eye view of A to E. The movement is not like the diagrams right.
[3]: The back part of E is twisted now, and * is between L and R. We slide L and R to the front (pain side) and let them cancel each other. Then we get the loop that is mirror symmetry with respect to *.
Now then, we cut a cruciform projective plane.
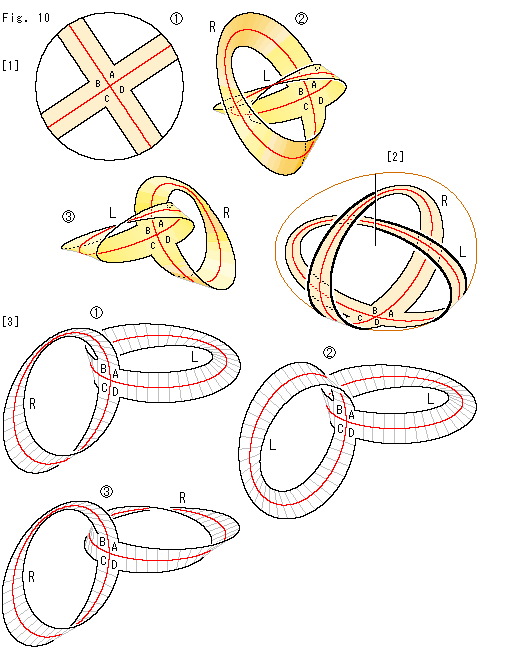
Look at Fig. 10.
[1]: We cut out a cruciform belt from disk-type projective plane  , and join their ends for identification. Then we get a cruciform projective plane
  or
or  . The joints of
  are at the same side. The joints of
  are at the opposite side, back to back. They are exchangeable as we saw it in Fig. 9. Aii we have to do is to turn one of branches to the opposte side while keeping the crossing ABCD fixed. Namely they are the same.
[2]: It is a cruciform projective plane on transparent Cross-cap. We can put any cruciform projective plane on Cross-cap because they are changeable to the type of  in [1].
[3]: We choose the back to back type and the right angle of intersection of the red center lines for easy to see.
There are different twist such as  ,
,  or
or  .
.  has common twists L and L. And
  has common twists R and R. Therefore we will investigate
  and
and  .
.
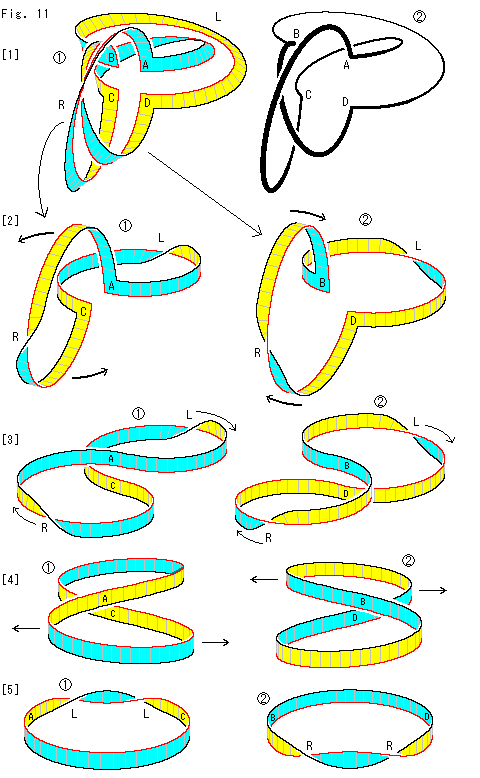
Look at Fig. 11.
We cut a cruciform projective plane with twists of L and R along the center line.
[1]: Then, it becomes as  . The loops of two Mobius strips are cut so that they must be no more one-sided, we guess. So we painted them. Yes, they have the front and back sides.
The two loops look like linked each other. To make sure of it we draw only the black edges  . The loop that passes A, C and the loop that passes B, D are certainly linked one another.
We lay the loop that passes A, C on the left row as  and the loop that passes B, D on the right row as
  . And we observe them in parallel. Twists are sharply drawn for easy to see.
[2]: We turn our side following arrows by 90 roughly.
  is counterclockwise and
  is clockwise.
[3]: Then, each becomes a figure-8 loop. Let R and L be canceled by sliding to A for  and to D for
  .
.
[4]: The parts A and D are turned upside down and inside out. See the situation by color of edges and faces. (Labels A, B, C and D are written upright regardless the situation.)
[5]: Each became a single loop. They have new twist that are caused by pulling in [4].  has two L and
  has two R.
That is to say, both of  and
and  are a simple loop with twist of 360
 .
.
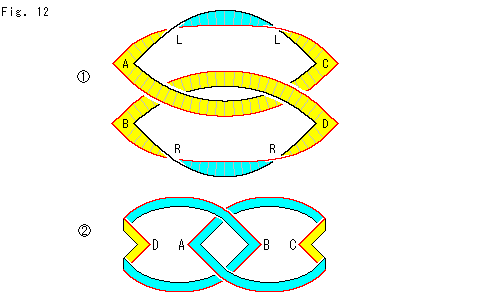
Look at Fig. 12.
We link two loops above together to represent the original construction.
 : Parts A, B, C and D are cornered just for a picture. The upper and lower loops are perfectly symmetrical.
 : It is done in another way. All labeled parts A, B, C and D face us in the original manner.
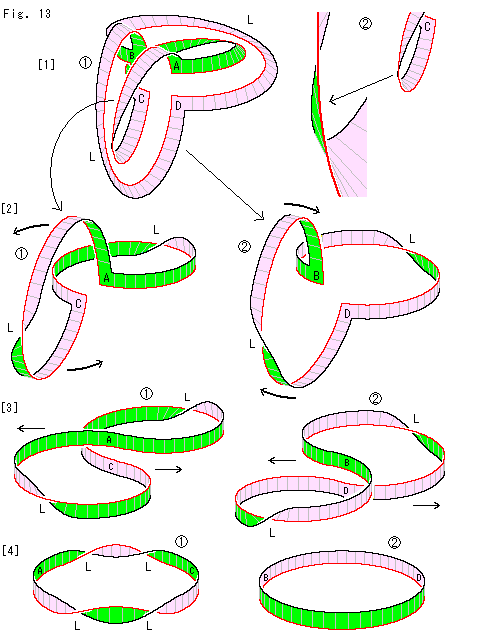
Look at Fig. 13.
Here we cut a cruciform projective plane with twists of L and L along the center line.
We use diffrent color from the above to avoid confusion.
[1]:  is just after cut. This time, two loops are separated completely without linkage.
  is an enlarged drawing of our side of the loop that passes A and C. We can clearly see how it is twisted now.
[2]: We do the same thing as Fig. 11 above.
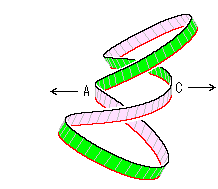
[3]: They become figure-8 loops. This  , if twists are smoothed, will be like the figure right. We can get the same result by pulling A and C apart, of course.
[4]: Each became a single loop. But  has twists of L, L, L, L, totally two of 360
 . Two twists L, L were added by the action of [3].
  has not any twist at all. Two twists R, R were created by the action of [3], and they canceled the original two twists L, L.
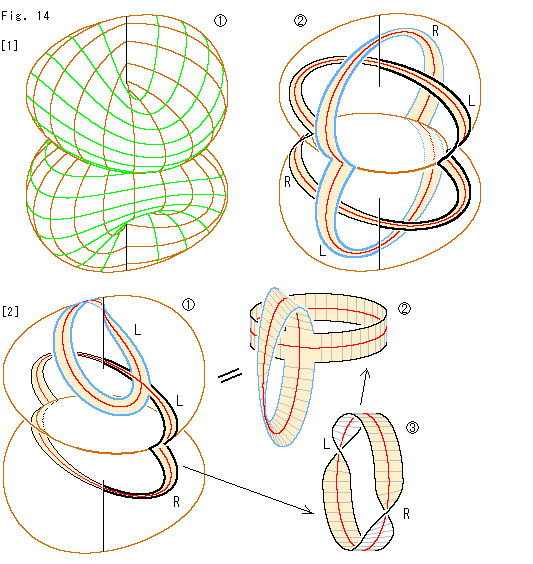 Look at Fig. 14.
[1]: Let us use two bottomless Cross-cap  docked bottom to bottom. We make it transparent, and put two belts on it as
  . They are passing both upper and lower Line of Self-intersection, so that they are not twisted as a whole.
[2]: We get a cruciform Klein Bottle applying the result of [1]. We take out the belt on  . It becames like
  . Because the black edged part of the belt that passes the lower Line of Self-intersection has R and L as
  , but we let them canceled mutually.
The bottoless Cross-cap is Mobius strip. Therefore  of [1] is what two Mobius strips jointed together. We have previously seen that the cut edge of bottom corresponds to the edge of Mobius strip. And Klein bottle is made by gluing edges of two Mobius strips. So it is natural that we could do [2].
But, if so, can we judge that  of [1] is Klein Bottle as it is? Two Mobius strips that form Klein Bottle must be twisted R and L respectively. However, two Cross-cap are the same. We do not see any difference between them. It is due to the fact that from the point of view of completed Klein Bottle, material does not matter. For instance, we can cut Klein Bottle open and get a single Mobius strip.
(As for Mobius strips with comon twist, we will touch on it in next chapter.)
Consequently, we can say  of [1] is Klein Bottle. The picture of this Klein Bottle is not like a bottle and seems nothing to do with inside or outside, not similar to the standard Klein Bottle. However, Line of Self-intersection has the same function as standard Klein Bottle.
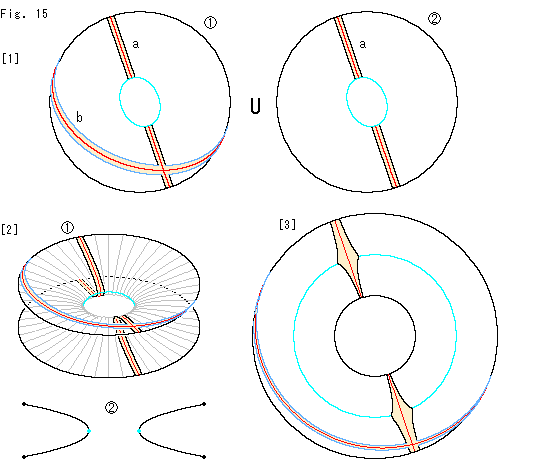
Look at Fig. 15.
It is what we realized from the above drawing process.
[1]:  and
and  are disk-type projective planes that correspond to the upper and lower of doked Cross-cap respectively. The sky blue hole corresponds to the truncated bottom of Cross-cap.
Belt a is to be the cylindrical part. Belt b is to be Mobius striplike. Let us suppose that when belt a comes to a hole edge, it appears at another hole edge. That is, two sky blue holes are the identical. The symbol U indicates it. Belt b always stays on disk-type projective plane, and avoids the hole.
[2]: We joint holes of the two disk-type projective plane, and make a rotary surface.  is its section.
[3]: The surface of revolution is homeomorphic to an annulus. We enlarge the sky blue hole and push up the lower part to the inside. Then we get the annulus as shown.
This illustration is just an example how we can see the relation between projective plane and Klein Bottle, that's all.
Let us go back to projective plane. We did not pay attention to four fan-shaped parts that we cut off from a disk-type projective plane for the cruciform projective plane. As a partial projective plane, a Mobius strip will do. It is not necessary to be cruciform. We do not think about identification of the edge of Mobius strip as well as the cruciform projective plane. This Mobius strip is an ordinary one.
The whole of projective plane is represented by a hemisphere or disk-type projective plane or Cross-cap. When we get Mobius strip from them, we cut off a single disk. The characters of disk are well known. That is helpful. So we try to dig Mobius strip out again.
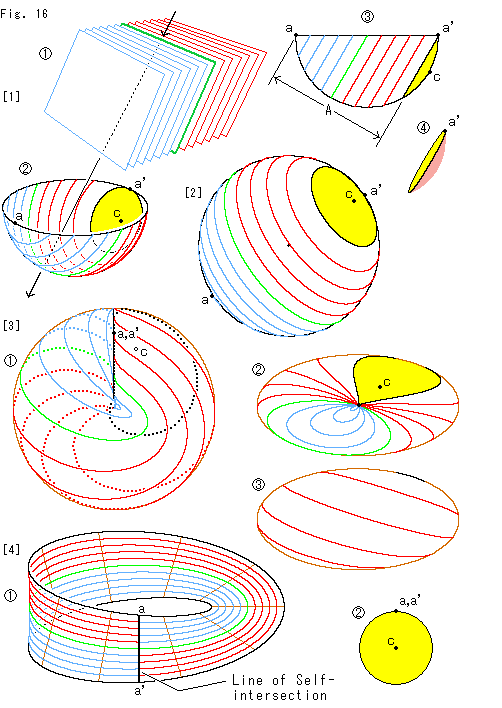
Look at Fig. 16.
We cut a hemisphere with parallel planes and get a Mobius strip.
[1]:  is parallel planes with regular gap. In
  only green cut-line is a great circle.
  is the view in parallel with cut ends. The parallel planes touch points a, a' and point c. A is the maximum width of Mobius strip we are going to get. The shape of yellow part is a dishlike
  .
.
[2]: It is the enlarged bird's-eye view of the hemisphere. It is the same as disk-type projective plane because its antipodal points are to be identified.
[3]: It is a upright Cross-cap made of the hemisphere with view direction as it is.  is the top view of
  and
and  the bottom view.
[4]: We cut off the yellow area. In  of [3] it is the inside of black dotted line. We choose the maximum width A, and we cut Cross-cap along the cut-line that passes points a and a' (see [1]). No cut-line seems not to pass point a. But point a is identified to point a', so that the black curve around point c passes both points a and a'. The black line aa' that traverses Mobius strip corresponds to Line of Self-intersection.
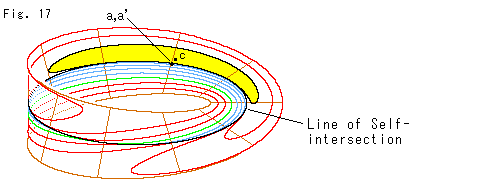
Look at Fig. 17.
This is a trial. We suppose cut-lines are just curves on Cross-cap. And we take Mobius strip out of it imitating the way to get Mobius-type projective plane. Naturally the line patterns are quite different from that of the above.
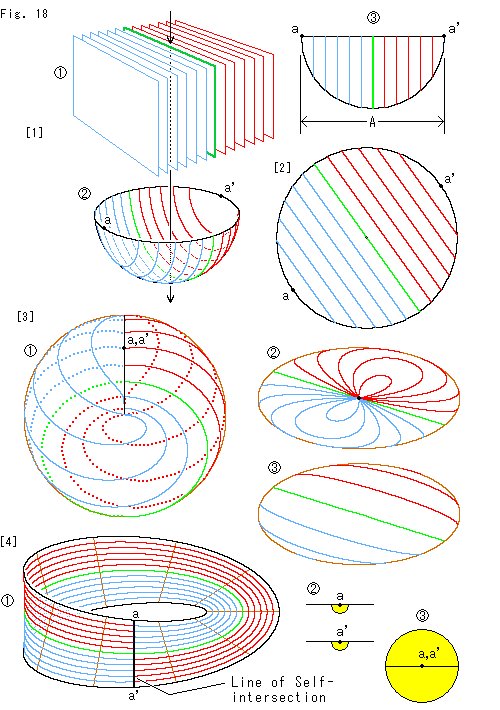
Look at Fig. 18.
We set the parallel plates vertically now.
[1]: We let the parallel plates  down and cut the hemisphere
  vertically. The parallel planes touch points a and a'.
A in
  is the maximum width of available Mobius strip.
[2]: It is the bird's-eye view of the hemisphere. It is equivalent to disk-type projective plane.
[3]: Cut-lines and points a, a' are transferred onto Cross-cap  . A cut-line is extended from neither point a nor point a'.
  is the top view of
  and
and  the bottom view.
[4]:  is Mobius strip with the maximum width A. It is the same as [4] of Fig. 16 but we selfishly assume that two points a, a' are micro-semidisks
  in practice. This Mobius strip covers Cross-cap almost entirely.
  is the disk when we did so.
This way of thinking about points a, a' is a matter of controversy. So we think it over again later.
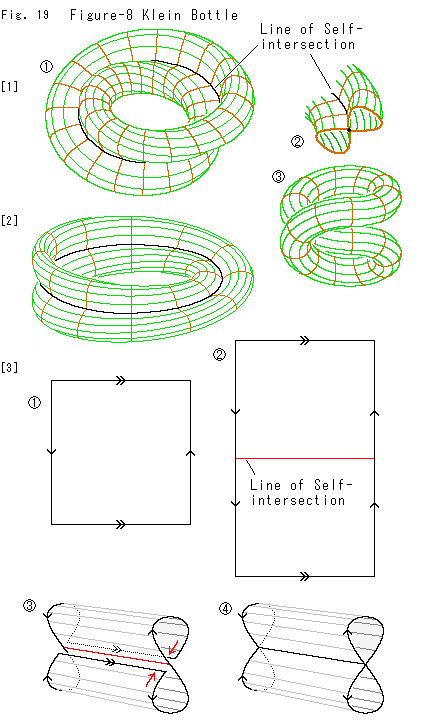
Look at Fig. 19.
At the beginning of this chapter we made a well-balanced Klein Bottle. There is another model called Figure-8 Klein Bottle. Let us see it.
[1]:  is Figure-8 Klein Bottle.
  shows its section. The surface is twisted like Mobius strip and self-intersects at the center line.
The shape of Figure-8 Klein Bottle is obtainable from a coiled tube  . We push the upper into the inside of lower, and glue the doubled part as line contact. Then we get Figure-8 Klein Bottle, provided that we ignore useless twists for construction.
[2]: We often see such a Figure-8 Klein Bottle as above. It looks dynamic and good. But let us reform it as  for our observation. It will look like an ordinari Mobius strip if you see it from a distance.
[3]: Let us confirm that Figure-8 Klein Bottle is an ordinary Klein Bottle. For that purpose we devise to get Figure-8 Klein Bottle from the square with arrows of Klein Bottle.
 : It is the square with arrows of an ordinary Klein Bottle.
 : We set Line of Self-intersection at the middle of square as shown.
 : We bend the upper and lower to Line of Self-intersection as shown with red arrows.
 : Both upper and lower are on Line of Self-intersection, and their identification is completed. They are assimilated into Line of Self-intersection now. Two arrows
  are deleted.
Two surfaces that cross on Line of Self-intersection have no relation each other. Therefore, the function of this  is the same as that of the square with arrows.
The identification of the right and left is completed by twisting and joining both ends like Mobius strip. And we obtain Figure-8 Klein Bottle. Now it is confirmed that Figure-8 Klein Bottle is nothing but a Klein Bottle.
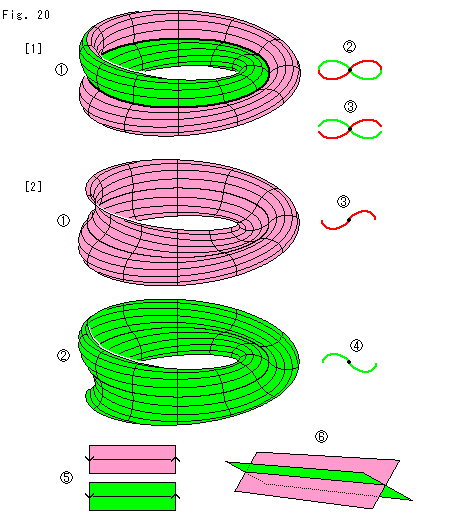
Look at Fig. 20.
Let us divide Figure-8 Klein Bottle.
[1]: Figure-8 Klein Bottle  is one-sided, and so we cannot but use single color to paint. But we intentionally paint Figure-8 Klein Bottle two colors for easy observation.
  is its section. We cut Figure-8 Klein Bottle along the whole circut.
[2]: Then, Figure-8 Klein Bottle is divided into two,  and
and  .
.  and
and  are their section at the right end.
  and
and  are Mobius strips with common twisting direction though their sections wave.
They can be changed into rectangular strips as  . The center lines are Line of Self-intersection. To restore them to the original Figure-8 Klein Bottle, we make them cross each other through Line of Self-intersection like
  , and turn back.
From this procedure, we even feel it possible to glue two Mobius strips together physically. And we would be upset to find it impossible wouldn't we?
Let us summarize what we have found about Mobius strips to construct Klein bottle. Our choice can be;
1 Mobius stip or
2 Mobius stips with common direction of twist or
2 Mobius stips with opposite direction of twist.
All of these will do.
"Self-intersection" is awfully convenient, isn't it? It is a means to materialize what in four-dimensional world in our three-dimensional world.
Why do we have to apply "Self-intersection"? Let us take a backward glance.
We had to identify antipodal points on the hemisphere in order to include infinite far away.
It can not be drawn on a two dimensional plane. So we regarded a curved surface as a plane and changed two-dimensional object into three-dimensional object.
Even so, it is impossible for us to draw the object normally.
Then,
We draw the object in three-dimensional world by applying Self-intersection.
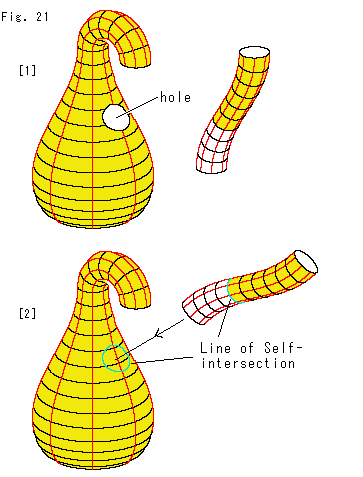
Look at Fig. 21.
In standard Klein Bottle we drilled a hole in the body for the handle to insert. But the drilling was not necessary if we had utilized Self-intersection.
[1]: It is the old way to construct Klein Bottle. There is a hole on the body.
[2]: Now we do not make a hole on the body. We can freely insert the handle into the body. The green circle is Line of Self-intersection. The body is not harmed at all.
 Look at Fig. 22.
With the idea of Line of Self-intersection, we can continuously deform the standard Klein Bottle into the tubular Klein Bottle, and vice versa. The diagram shows its sections. The left end is the standard Klein Bottle and the right end is the tubular Klein Bottle in Fig. 1. The point  is the section of Line of Self-intersection. Its number chages on the way.
Thus it is confirmed that the tubular Klein Bottle is the same as the standard Klein Bottle.
By the way, as to models of projective plane, they say that there are well balanced two models. One is called Roman surface and other is Boy's surface. But we do not think them useful for us now. So we omit them.
A mathematician has asked us, "Why do you study topology for hyperbolic geometry?"
Hyperbolic geometry came out by the assumption that parallel line will meet at infinity. However, a disk model, for intance, is an open disk, say no edge. It excludes infinity. On the other hand projective geometry created the disk model. That is why we have fumbled with Mobius strip, Cross-cap and so on to understand projective geometry.
Don't you think it is a fault of the disk model that does not cover infinity? But if the circumference of sisk is a line at infinity, we have to identify antipodal points. And our story on the disk would be routed. Is there any possibility to find the model that includes infinity without destroying our previous story?
We may have to learn measure or neighborhood of infinity for that pourpose. Let us attack them later.
Anyhow, we have touched the basics of what relates with identification of antipodale points of the hemisphere.
[Back] [Next] [Contents]
 Look at Fig. 1.
 [2]: We split Klein bottle in half along the green line.

 Look at Fig. 5.


 [1]: We deform the roop A. We fix the front part marked with "*", and turn the back around it. Then roop A changes to B-C-D-, and finally E.


 Look at Fig. 14.


