Hyperbolic Non-Euclidean World
Ch. 43 Paper craft 
Let us do some handiwork with sheets of paper, and think variously. Here 180 -twist is also denoted; left-handed by L, right-handed by R.
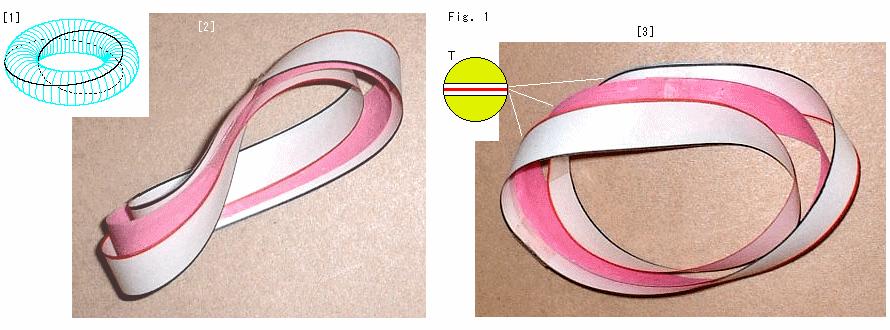 Look at Fig. 1.
[1]: We have cut a flexible torus and got a Mobius strip before. The black curved line is the track of cutting.
[2]: The photo is a paper craft to show the situation at that time. The red belt is the Mobius strip and the white belt is the surface that contacted to it. They are loosened a little for easy observation. The white belt is two-sided. So we colored edges brown and black separately.
[3]: The picture is taken in different direction. T is the section of torus.
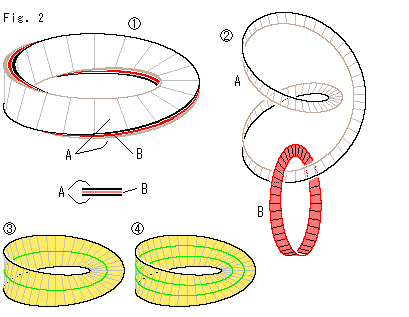
Look at Fig. 2.
The photo pictures above do not show details. So we drew  for perfect observation. It is a three-layered Mobius strip. They have a bit of thickness for easy to see.
  shows a view after loosened it up.
This A in has been drawn before. We got it by cutting the upper part of Cross-cap. A can also be obtained by cutting Mobius strip  along its center line or the like. If we make two circuits and cut Mobius strip
  , we get A and B together as in .
We turn ourselves not more than 360 when we creep on the entire surface (two circuits) of Mobius strip. Nevertheless, the white belt that is stuck to it twists two times of 360. Is it true?
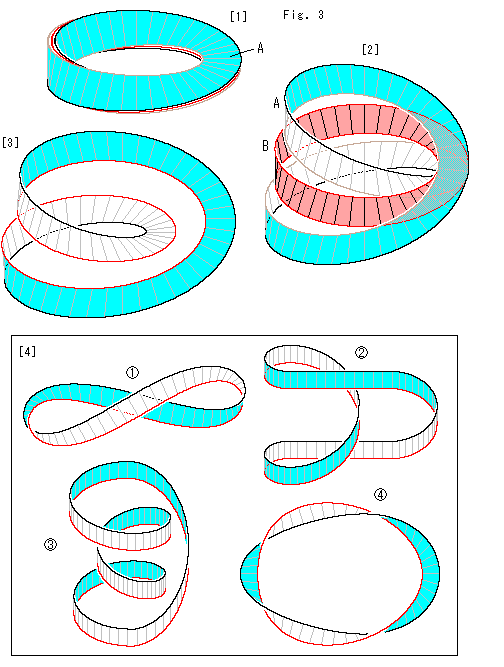
Look at Fig. 3.
[1]: The belt painted sky blue is loop A in Fig.2. It is two-sided, and so we can distinguish its surfaces by color.
[2]: The left parts of loop A are vertically pulled apart from Mobius strip B a little. The white surface, rear side, of loop A appears now.
[3]: Mobius strip B is omitted. The right parts of loop A are horizontally separated a little each other. The brown edge is colored red now for a striking contrast. Well, the twist is 360 as long as we see this diagram, isn't it?
[4]: The belt poses variously such as to when it is loosened. The twist of is truely two times of 360! We did neither cut nor twist it while loosening. Nevertheless, why?
Roughly speaking, [3] is a coil of duplex winding. This [4] is a ring of single winding. It seems that a 360-twist is hiding itself in a winding.
Let us confirm it. We begin with simple matters.

A sheet of paper is easy to bend or roll as shown right. But it is almost impossible to deform the surface itself like right. And yet, we can smoothly twist a paper belt except an extreme case. Because microscopic elasticity is piled up to form a shape. But it will be out of shape if we pull it too much.
If we use a sheet of rubber, we can make distortion considerably. We are going to draw experimental figures with rubber belts, but paper belts will do for understanding.
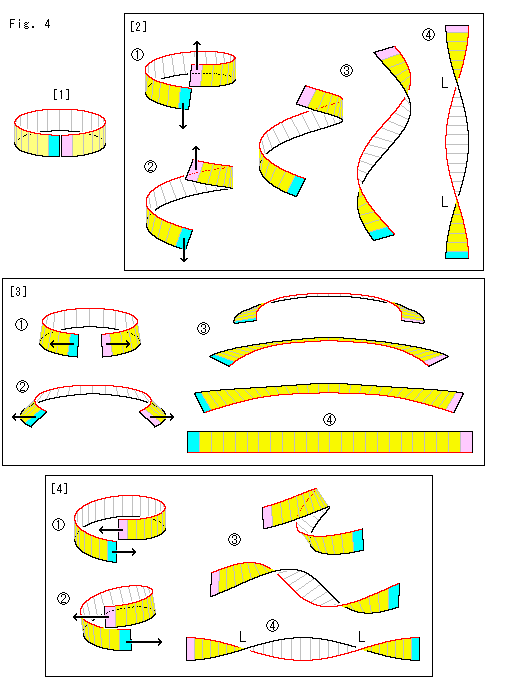
Look at Fig. 4.
[1]: It is a cut cylinder. The outside is painted yellow, and the cut ends are colored sky blue and pink.
[2]: We pull up the pink end and pull down the sky blue end while keeping them face to us. But hold them loosely so that they can turn freely. The cut cylinder changes to , and its each end turns clockwise by 90. And two twists of L or 360-twist has appeared. Why? We did not give any horizontal turning.
[3]: This time we horizontally pull the cylinder as shown . Then, it chages to . is just a rectanglar strip without twist though the edges are upside-down.
[4]: We shift the cut ends of cylinder, the pink end up and the sky blue end down. And we pull them horizontally as shown . Then the cut cylinder chages to . The result is the same as that of [1]. However, the end parts of this did not turn.
Now we understand, through these experiments, that
360-twist is created when a "ring" is pulled to shrink.
 The pulling direction does not matter as long as the diameter of ring shrinks.
What we say "ring" here means windings shown right. is an ordinary ring and others are similar to it for our eyes. is three rings, is one ring. is also one ring.  is two rings. Naturally the number of rings depends on direction we observe. But we count them just as they are.
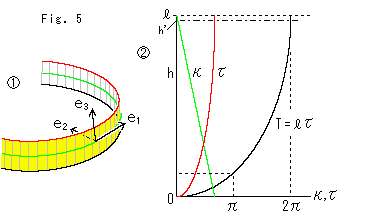 Look at Fig. 5.
Let us see [2] of Fig. 2 by calculation. The cylinder chages to a helix, and then to a straight line by pulling. In differential geometry they imagine a point travels on a curved line and define three orthogonal vecters; velocity vecter (tangent vector)  , acceleration vecter (principal normal vector)
  and binormal vector
  as shown . And they use so-called curvature
  and torsion
  . Fortunately this helix is regularly formed, so that we can calculate them easily. The twist is the total rotation of with respect to as the rotation axis.
The graph shows relations among the height h of helix, , and T. T is overall twist at h. It becomes 360 when the helix stretched up to the length  of center line, h = . This T is the twist of center line, and also of the belt. The torsion of a straight line is zero. But we calculate it as a limiting value of the helix.
At the beginning, the length of edges equal to that of the center line of the cylinder. But when the belt becomes a helix and gets twisted, we have to extend the length of edges to make ends even with the ends of the center line. A rubber belt compensate for it easily. h' is the maximum height of helix when a somewhat hard belt is used. However, as you see, the difference between h' and is small enough unless the width of belt is so big.
What we say "ring" includes not only a cylinder but also an annulus, Mobius strip or the like.
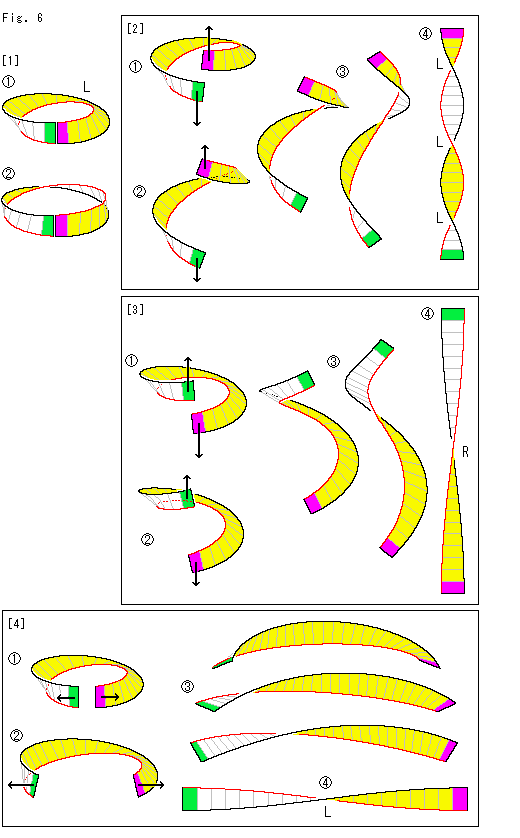
Look at Fig. 6.
Let us confirm that Mobius strip is a "ring" to make sure.
[1]: It is a cut-Mobius strip with L. It is two-sided, and so we paited one side yellow. Its end surfaces are not the same side like Fig. 4. is the standard type. The length of the black edge and the red edge is not even. We tried to distort and got that has equal length of edges. But we use and shape it up at the final stage.
[2]: We pull the cut-Mobius strip as shown . It becomes to . The final shape is a rectanglar strip with three of L. Mobius strip originally had L. Then two of L are added by the pulling. That is
L + L  2 = L 3 .
[3]: This time, we pull green end up and pink end down. The result is that is what we guessed from [2].
That is
L + R 2 = (L + R) + R = R .
[4]: We horizontally pull the cut-Mobius strip as shown . The final shape is . Since this pulling does not shrink the ring of Mobius strip, an additional twist does not come out.
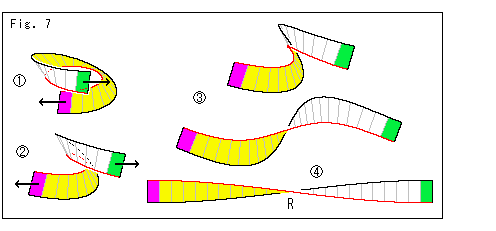
Look at Fig. 7.
It is self-explanatory.
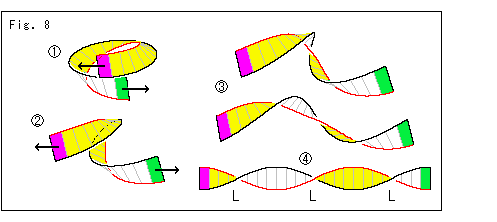
Look at Fig. 8.
It is also self-explanatory, isn't it?
The twist of the center line of cut-Mobius strip is the same as that of the cut-cylinder. That is, the twist of the center line is additional to the original twist of Mobius strip (before cut).
In daily life "a twist of belt" means the total turning with respect to forward direction when we travel on that belt. When we travel on a Mobius strip, we turn ourselves 180 at a circuit. But the real twist of Mobius strip is more than 180 becaue Mobius strip itself is a loop. That makes us confused.
Look at Fig. 9.
Let us begin with daily sense, not from the view point of differencial geometry.
[1]: Z is the vertical axis that stands at the center of Mobius strip. The point t is moving to t' now. A small area at t somewhat turns around forward direction tP as shown the red arrow. Simultaneously the small area somewhat turns around tV that is in parallel with the axis Z. We can obtain the real twist of Mobius strip if we gather these two kind of twists. What we say "real" is the case we see Mobius strip from outside. It is equivalent to the case we see the earth together with the sun. The earth moves round the sun, as it rotates on its own axis. The earth actually makes 365 + 1 rotations in a year. But it is 365 rotations in a year when it is seen from humanbeings on the earth.
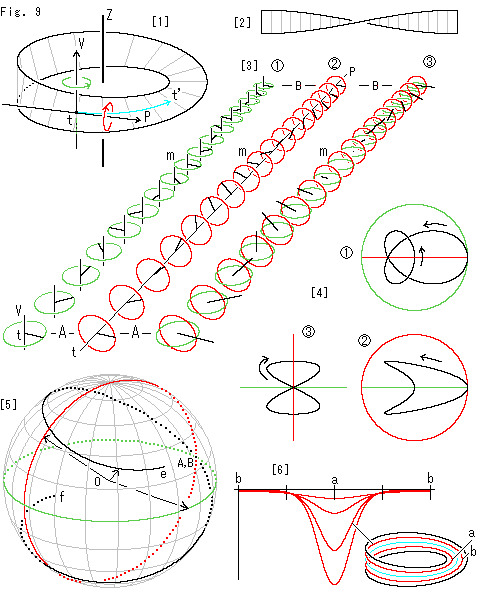
[2]: It is the twisted rectanglar strip that made of Mobius strip after cut. This twist is obviously 180. Namely it shows only the twist we see on Mobius strip, not from outside.
In another words,
Mobius strip is actually twisted 180  360.
360.
Symbol "" denotes composition of two different twists in direction.
[3]: We stretch the forward direction of two circuits on Mobius strip and lay rotating vectors on it. and show rotation around tV and tP respectively. Am is on the first circuit and mB is on the second circuit. A, m and B are at the same location on Mobius strip. The size of rotating vector is meaningless, so that it is kept constant. The vetcor of makes one rotation around tP while the vetcor of makes two rotations around tV.
is the composition of vectors of and . The composite vector at m is zero.
We do not know whether this composition is suitable or not, but let us continnue anyway.
[4]: We set all of green and red circles at a location, and traced the tip of composite vectors. is the top view and is the front view. Each locus starts at the right end and moves as shown with the arrow. is the left view of .
[5]: What is called Gaussian spherical representation is usualy used for the tangent vector of a curved line in space. But we tried to apply it to three kinds of vectors in [3]. The three arrow vectors show a trio of the three kinds of vectors. The black curve idicates the movement of composite vector. Its end points e and f are at antipodal points of the sphere O, and the composite vector jumps from e to f at m.
Well, we can not see the twist of Mobius strip with the sphere we have drawn, can we?
[6]: The red curves show curvature of equidistant lines from the center line on Mobius strip. (They are not lines of curvature.) They are negative throughout the equidistant lines. The farther an equidistant line gets apart from the center line, the more dents its curvature. The curvature gets the negative maximum at a and almost zero at b, see [1]. The vertical axis of this graph is enlarged about 100 times to show cueves clearly.
A paper-made Mobius strip is evenly twisted and curved in all directions. Therefore, the curvature of its equidistant line should be different from [5], and probably the graphic curve is horizontal. However, [3] and [4] must be unchanged, we guess. (We have not yet find the equation that indicates a paper-made Mobius strip. Sorry to say, but we cant show you any proof of our guess now.)
Well, it seems better for us to stay upto of [3]. We can find nothing by imitating differential geometry. Even so, the spherical representation is full of interesting suggestions. We have a feeling that we pick up something good someday. (In differential geometry of curved surface there is no "torsion" but "curvature".)
In any event, 360 rotaion is magical and tricky. It looks innocent though it made a change and put it all back.
**************************************************
Now, we investigate the twist of white belt in Fig. 2.
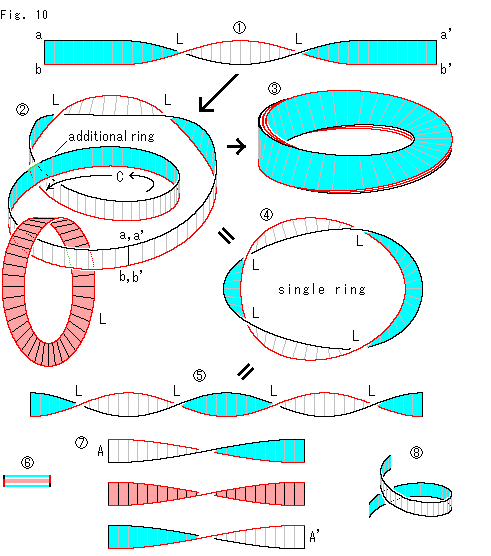 Look at Fig. 10.
: It is a rectangular strip with 360 twist. We are going to get by attaching it on Mobius strip.
: We connect both ends of after adding a "ring" like C.
: It is a three-layered Mobius strip. The number of layers depends on how to count. So we should call the strip a two-layered Mobius strip, should'nt we? But let us say "three-layered" just for explanation.
: It is a single "ring" we get by unraveling the long loop of . It is twisted by two times of 360. New two L are added to the original two L.
: It is the rectanglar strip that made of after cut. and are obviously different. In Fig. 9 the twist of rectangular strip made by cutting Mobius strip was the twist that residents on Mobius strip observe. It is because "ring" of Mobius strip was disentangled by the cutting.
But here we cut , not . We should cut if we want to see the twist by cutting, shouldn't we?
 : It is the section of three-layered Mobius strip . The layers have minor thickness for drawing. Pay attention to that the sky blue layer is turned by 180, and so the upper and lower are reversed each other.
Although the outward layer of this is two-sided, its appearance excluding edges is a single color of sky blue.
: It is the section of three-layered Mobius strip . The layers have minor thickness for drawing. Pay attention to that the sky blue layer is turned by 180, and so the upper and lower are reversed each other.
Although the outward layer of this is two-sided, its appearance excluding edges is a single color of sky blue.
 : We cut three-layered Mobius strip and get three of rectangular strips with 180 twist. Now we connect A to A', and we get back the original belt . That is to say, shows the twist that residents on three-layered Mobius strip observe.
Note: As for , we have said "three-layered" but mathematically a surface has no thicknes so that there is no difference whether we are on the blue surface or the red surface.
 : We have to be careful. In we must make the "ring" by passing over as shown with arrow C rather than passing under. If we choose underpass like , we can not stick the belt onto Mobius strip. Because two of new R are created, that cancel two of orinal L.
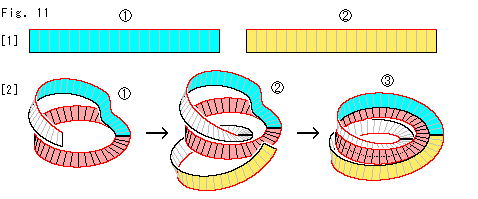 Look at Fig. 11.
[1]: In Fig. 10 above we prepared a twisted rectangular strp at the beginning. But we can make a three-layered Mobius strip with an untwisted rectangular strp. Because our rectangular strp is elastic, and it automatically fits Mobius strip when attached. Two rectangular strips and are to confirm it. A single strip is enough but we prepare two just for an easy illustration.
[2]: Add the strip to Mobius strip as if gluing like . The strip is so elastic that it fits Mobius strip exactly. Next joint the second strip to the first, and add it to the Mobius strip as shown . Then, we can see a new "ring" that is automatically made in the loop of Mebius strip. We joint the final end to the first end on Mobius strip as shown . It creates another "ring". That is, two rings and two of 180 twists are added during this manufacturing process. The total twist is
360 x 2 180 x 2 .
Simbole "" is the same as that of the story of Fig. 9. If we exchange "" for "+", far from being two times of 360, three times of it!
Now the question "Why so much twisted?" is solved.
What it boils down to is that twists of 360 are immanently created as maney as rings we make. And they become obvious when the shape of rings are deformed as we have done.
By the way, we sometimes used wording "opposite surface" or "entire surface" regardless one-sided or two-sided. When we say "a point on a surface", we usually do not bring it into question whether the point is on the front or the back. It is quite natural because a mathematical surface has no thickness. However, we imagine an opaque paperlike when we say such as "opposite surface". If not, we can not make a talk about a layered Mobius strip. Do not be confused on this point.
**************************************************
Let us make a Cross-cap with a sheet of paper.
 Look at Fig. 12.
: We construct the upper part of Cross-cap with two semicircle paper. Make a cut into each semicircle O as a and b. The length of cut is a half of the radius.
: Clamp a and b.
: Squeeze them until bottom edges are leveled, and glue circular edges together as shown with arrows.
: And blow it up. Then we get the upper part of Cross-cap. The skirt is somewhat narrow. If you don't like it, use semi-elliptic sheets with long horrizontal radii.
: Next we make the lower part of Cross-cap. Use two semi circular sheets. Their size should be the same as but no cut. Glue their circular edges and centers O as shown with arrows.
: And blow it up. Then we get the lower part of Cross-cap. Dock it to . Coross-cap is entirely completed now. It is better to fill and with something before docking.
We used two parts, the upper and lower. Instead, just for the shape, they can be vertical parts, the right and left. But it does not construct the line of self-intersection properly. Bcause a paper surface must continuously pass through the line of self-intersection.
: Our Coross-cap is put right in front of us. The coloring is trange, because paper compornents are two-sided.
 Look at Fig. 13.
This time, we make the upper part of Cross-cap with a single sheet of paper.
: Cut a circular sheet of paper as shown a and bOc. bOc is right angled. The length of b and c is a half of the radius, and they are on the same diameter.
: Open bOc. Bend the upper to us and clamp a and b as shown.
: Squeeze them tightly, and rejoin c.
: Blow up skirts. Then we get the upper part of Cross-cap.
Adjacent two cones with a common vertex form a similar shape to it. But the junctional line of two cones can not be the line of self-intersection because the surface of cone does not pass through it.
: It is a bottom view.
: To make skirt line leveled use an elliptic sheet as shown, though the top O is still sharp. We have to use a rectangular sheet to avoid the sharpness. But it becomes Whiteney's umbrella.
Make a slot on the line of self-intersection Oba. It goes through to the back. Put an elastic band through the slot, and we can observe relations between Cross-cap and Mobius strip.
 We construct a cone with base edge fits the edge of Mobius strip. The cone is rolled double and has a self-intersection.
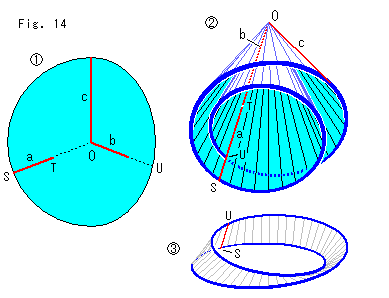
Look at Fig. 14.
: We use the sheet of paper as shown. The left half is semi-circular and the right half is semi-ellipse. Make cuts along red lines a and bOc. The distance between O and T is equal to the length of b.
: Similarly to Fig. 13 above, clamp a and b. Then we get a smaller cone. Rejoin c like a wrap-around. Line UO is the line of self-intersectin now.
: It is the Mobius strip that fits the base of cone exactly.
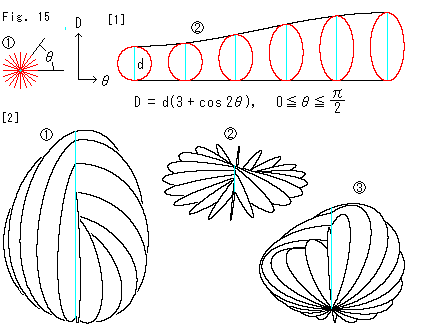
Look at Fig. 15.
Let us make a paper craft of Cross-cap that we used in previous chapter.
[1]: We use ellipses with a common vertical axis. They forms a horizontal water wheel-like. is their top view. Their horizontal diameters are equal d, and vertical dimeters D change by angle  as shown .
[2]: is Cross-cap assembled with the ellipses. is its near top view and is the bottom view.
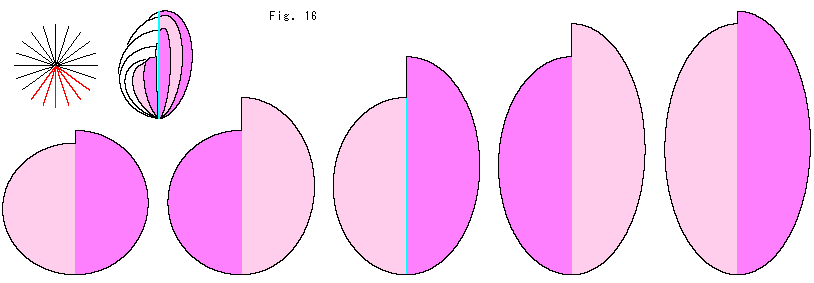
Look at Fig. 16 below.
It is easy to make a Cross-cap using the picture below. The upper left is a view of a fourth part of the completion. Make four of them and glue in series. You may print out the picture and construct the Cross-cap.
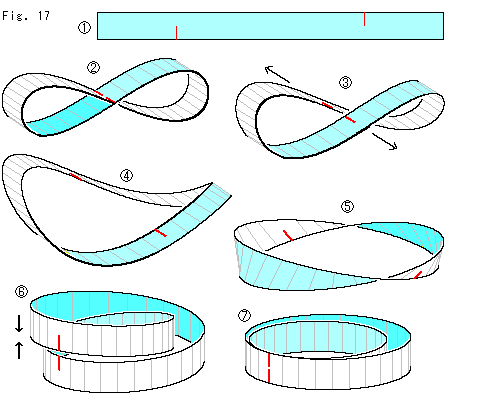
Look at Fig. 17.
We begin with the figure-8 surface that is a cut-out of the upper part of Cross-cap.
: Make two cuts into the rectangular strip as shown red lines.
: Clamp the cuts each other. After that, joint both ends without twist. It forms a figure-8 belt. We start with this.
: In order to see the twist of figure-8 belt we newly pull off the clamp.
: It is more opened.
: We see that the belt is a loop with 360 twist after well untangled.
: The same side of the belt faces us when it is curled as shown. Clamp the cuts mutually again.
: What we get is the same stracture as the cut of cone in Fig. 14. It can directly be obtained from by tangling.
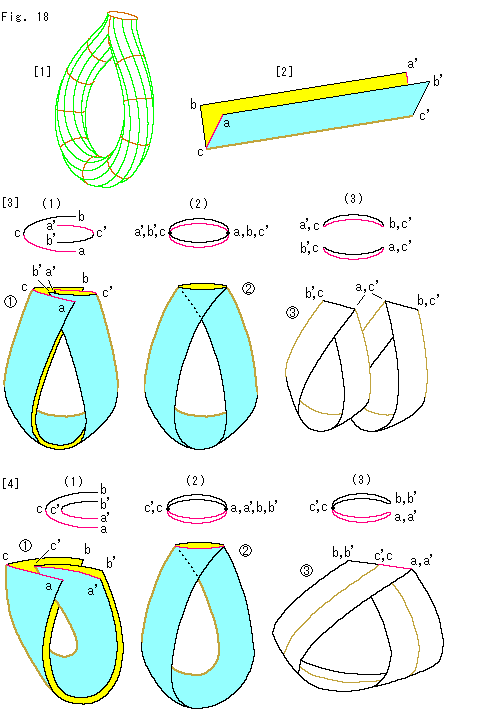
Look at Fig. 18.
We have observed that the number of Mobius strips that can be obtained from Klein Bottle depends on the way of cutting. Let us see it with paper crafts.
[1]: It is a tubular Klein Bottle. We make this symmetric Klein Bottle with paper, and cut it for paper Mobius strips.
[2]: Fold a rectangle strip as shown. The end lines ac and a'c' are painted red, and the bottom fold is painted brown for following illustration.
[3]: Insert one end into the other as shown . (1) is its top view. Joint edges ac and b'c', a'c' and bc. And glue U-shaped long edges ab' and a'b except the upper part that is the line of self-intarsection. We got the same Klein Bottle as [1].
Now we cut this paper-made Klein Bottle along the brown edge. Then we get twin Mobius strips.
[4]: This time, insert one end into the other in the different way as shown . And similarly to [3], glue the U-shaped long edges ab' and a'b. This Klein Bottle looks different from that of [3] but they are the same as a Klein Bottle.
Now we cut this Klein Bottle along the long black edge that we glued just before, and separate ab' and a'b. And unfold it along the long brown edge cc'. Then we get a single wider Mobius strip.
It is left-handed. But we can also get a right-handed one if we insert acb into a'c'b'.
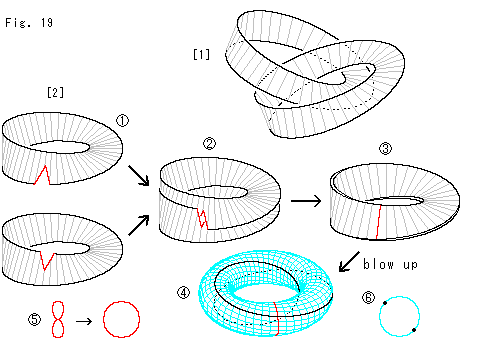
Look at Fig. 19.
If we glue edges of a right-handed Mobius strip and a left-handed Mobius strip, we get Klein Bottle. But it is said that we get a twisted torus if we glue edges of two Mobius strips with the common twist. Let us try to confirm it with paper crafts.
[1]: In general, it is impossible to lay a Mobius strip on another Mobius strip. Linked Mobius strips as shown do not work either.
[2]: So we make a cut on each Mobius strip as . Clamp the cut each other as and . Glue edges together. The red line is a self-intersection now. Blow up and we get a torus provided that the red line is forced to deform into a ring as shown . In short, we ignore that it was the self-intersection. And locally, this torus is partitioned into two surfaces by the black line, and we regard it as a
composition of two Mobius strips. is the section of torus that consists of the two Mobius strips.
Needless to say, the completed torus should have neither the black line nor the red line.
 Let us see some strange paper crafts.
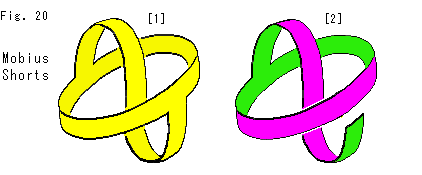
Look at Fig. 20.
[1]: It is what is called Mobius shotrs. It is one-sided. Is it twisted or not?
[2]: It will be clarified by painting its face. The picture is painted after cutting. The S-shaped part may be compared to a bypass that connects the front and back. How can we cut a sheet of paper to get this pants. Think before cutting.
Suppose we get a paper Mobius shotrs [1] now. What should we do to see its twist without cut or painting? The pants never become a single loop whatever untangled.
 Look at Fig. 21.
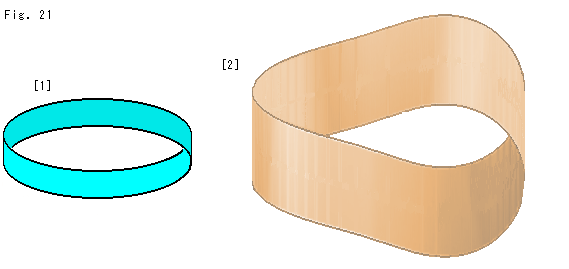
[1]: Doesn't this loop look like one-sided? Move yuor eyes. Is it Mobius strip?
It is impossible for us to make this loop, absolutely. It is an illusion art. But it forces us to think over, doesn't it?
[2]: How about this? It is strange somehow or other. It is not an illusion art. It is an ordinary belt with 360 twist. Yet, why does it become strange and honest by turns? Well, we humanbeing have only a superficial understanding of three-dimention.
Let us fish paper crafts and go back to projective geometry.
[Back] [Next] [Contents]